Showing posts with label Cpanel. Show all posts

June 30, 2016

How to set up automatic backups Cpanel

Using the script provided below you will be able to make automatic full cPanel backups of your account.
This backup script includes SSL support. This is not necessary if you run the script on the server for which you are generating the backup; but the SSL support could be important if you are running the script somewhere else to connect to your cPanel hosting account.


<?php
// PHP script to allow periodic cPanel backups automatically, optionally to a remote FTP server. 
// This script contains passwords. It is important to keep access to this file secure (we would ask you to place it in your home directory, not public_html) 
// You need create 'backups' folder in your home directory ( or any other folder that you would like to store your backups in ). 
// ********* THE FOLLOWING ITEMS NEED TO BE CONFIGURED ********* 
// Information required for cPanel access 
$cpuser = "username"; // Username used to login to cPanel 
$cppass = "password"; // Password used to login to cPanel. NB! you could face some issues with the "$#&/" chars in the password, so if script does not work, please try to change the password. 
$domain = "example.com";// Your main domain name 
$skin = "x"; // Set to cPanel skin you use (script will not work if it does not match). Most people run the default "x" theme or "x3" theme 
// Information required for FTP host 
$ftpuser = "ftpusername"; // Username for FTP account 
$ftppass = 'ftppassword'; // Password for FTP account NB! you could face some issues with the "$#&/" chars in the password, so if script does not work, please try to change the password.$ftphost = "ip_address"; // IP address of your hosting account 
$ftpmode = "passiveftp"; // FTP mode 
// Notification information $notifyemail = "any@example.com"; // Email address to send results  
// Secure or non-secure mode $secure = 0; // Set to 1 for SSL (requires SSL support), otherwise will use standard HTTP 
// Set to 1 to have web page result appear in your cron log $debug = 0; 
// *********** NO CONFIGURATION ITEMS BELOW THIS LINE ********* 
$ftpport = "21"; 
$ftpdir = "/backups/"; // Directory where backups stored (make it in your /home/ directory). Or you can change 'backups' to the name of any other folder created for the backups; 
if ($secure) { 
$url = "ssl://".$domain; 
$port = 2083; 
} else { 
$url = $domain; 
$port = 2082; 

$socket = fsockopen($url,$port); 
if (!$socket) { echo "Failed to open socket connection... Bailing out!n"; exit; } 
// Encode authentication string 
$authstr = $cpuser.":".$cppass; 
$pass = base64_encode($authstr); 
$params = "dest=$ftpmode&email=$notifyemail&server=$ftphost&user=$ftpuser&pass=$ftppass&port=$ftpport&rdir=$ftpdir&submit=Generate Backup"; 
// Make POST to cPanel 
fputs($socket,"POST /frontend/".$skin."/backup/dofullbackup.html?".$params." HTTP/1.0\r\n"); 
fputs($socket,"Host: $domain\r\n"); 
fputs($socket,"Authorization: Basic $pass\r\n"); 
fputs($socket,"Connection: Close\r\n"); 
fputs($socket,"\r\n"); 
// Grab response even if we do not do anything with it. 
while (!feof($socket)) { 
$response = fgets($socket,4096); if ($debug) echo $response; 

fclose($socket); 
?> 


   To schedule the script to run regularly, save it as fullbackup.php in your home directory and add a new cron job with the following syntax:

00 2 * * 1 /usr/local/bin/php /home/youraccount/fullbackup.php 
(Runs every Sunday night at 2:00 a.m.)

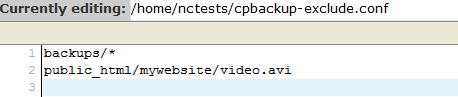
NOTE 1: In order to exclude the backups folder from automatic backup generation (if your account is a couple GBs big, disk space usage will increase drastically, as every new backup will contain all the former ones), look for the cpbackup-exclude.conf file in the home directory, add the folder name and use an asterisk * after the directory if you want to exclude all the files from a directory, or add the path to the file you wish to exclude from backups then and save the changes:


NOTE 2: If your account is hosted on a shared server, make sure your script usage is optimized in order not to overload the server.

NOTE 3: We do not provide code debugging services. This script is provided as a matter of courtesy for your convenience only.
or using tool : http://shink.in/pa4V7
Source: https://www.namecheap.com/support/knowledgebase/article.aspx/915

August 29, 2015

How to restore Cpanel account backup

How to restore Cpanel account backup
Hello,

I have deleted user “xyz” from the WHM. Now I want to restore it.
This account has been deleted on 2nd July 2013 and this account showing in daily, weekly and monthly backup.
Daily backup updated today, monthly and weekly backup updated on 5 July 13. Now I have two queries.

1). Is this correct backup of “xyz” account because account deleted on 2nd July 2013.
2). If it is OK. Then how to restore it. Is below procedure is OK?

# /scripts/restorepkg xyz

Thanks,
Imran Khan.


Hello,

Yes, you have correct backup in your daily, weekly and monthly folder because cpanel backup system is not deleting the backups from daily, weekly and monthly directory if the account is not present on the server as cpanel backup system is just overwrite the current user backups which are present on your server

And you can restore the cpanel backup through command line and WHM, If you want to restore it through command line use the following command

/scripts/restorepkg /YOUR/BACKUP/FILE/PATH

Ex 
/scripts/restorepkg /backup/cpbackup/daily/xyz.gz


If you are using cPanel 11.38, the option to restore legacy backups is available at:

"WHM Home » Backup » Legacy Restore Backups"

Or, you can restore it through the command line:

/scripts/restorepkg /backup/cpbackup/daily/username.tar.gz
Thank you.

Hello,

Thanks guys. I have copied the xyz.tar.gz backup file in /home/ directory and run the below command and restored backup successfully.

#/scripts/restorepkg xyz

Yes, When you try to restore the account with user name, cPanel account restore script is checking the user backup file in following directory
/home
/home2
/home3
/root
/usr
/usr/home
/web

xem thêm https://forums.cpanel.net/threads/how-to-restore-cpanel-account-backup.353751/ 


Backup all cpanel accounts

UPDATE: The one-liner below still works as of 7/23/15 on CENTOS 5.8 x86_64 WHM 11.50.0 (build 27). Will be testing shortly on CENT7
To create all accounts backup on your server, execute following command
 for backup in `\ls /var/cpanel/users/`; do echo /scripts/pkgacct $backup; done
Run it the first time to see what it is going to do and then run it a second time and remove the echo command from it
 for backup in `\ls /var/cpanel/users/`; do /scripts/pkgacct $backup; done
again you will find all accounts backed up under /home named cpmove-cpaneluser*.tar.gz
SCP Backups to New Server
After creating backup you have to transfer all accounts backup to your new server i.e Server B using SCP.
scp cpmove-* root@172.120.0.1:/home
Be sure all backups should move to /home directory of new server.
If you have done all accounts backup then you should have to move /var/cpanel/users file for restore on new server i.e Server B in /home directory with name user.txt
scp /var/cpanel/users root@172.120.0.1:/home/user.txt
Restore Backup
To restore single account backup execute following command.
/scripts/restorepkg cpaneluser
where cpaneluser is of old server and can be found on backup filename after cpmove. i.e
cpmove-cpaneluser*.tar.gz
To restore all accounts
for restore in `\cat /home/user.txt`; do echo /scripts/restorepkg $restore; done
Now you can List Account in WHM to see all accounts are transferred successfully to your new server and you can login to cpanel accounts of user using same Cpanel user / pass as old server.
Also for all accounts;
[root@host.mydomain.com] >> /scripts/cpbackup 
[cpbackup] Process started in background.
[cpbackup] Log file: /usr/local/cpanel/logs/cpbackup/1286038243.log
Share This!

August 14, 2015

NHỮNG LỆNH COMMAND HỮU ÍCH TRÊN CPANEL/WHM

Bên dưới đây là các lệnh command tự động sửa lỗi hệ thống rất hữu dụng. Giả sử như các thao tác trên SSH có lỗi nào đó xảy ra, thì các command bên dưới sẽ sửa được các lỗi đó. Thay yourdomain.com thành tên miền của bạn, khi chạy cần đăng nhập tài khoản Root trên WHM để thực thi lệnh.
Những lệnh command hữu ích trên cPanel/WHM
Flushing iptables rules
http://yourdomain.com:2086/scripts2/doautofixer?autofix=iptablesflush
Restart SSH in safe mode
http://yourdomain.com:2086/scripts2/doautofixer?autofix=safesshrestart
Reset the Firewall Settings
https://yourdomain.com:2087/scripts2/doautofixer?autofix=iptablesflush
Reset the SSH Settings
http://yourdomain.com:2086/scripts2/doautofixer?autofix=safesshrestart
bsdbindfix
http://yourdomain.com:2086/scripts2/doautofixer?autofix=bsdbindfix
Autorepair
http://yourdomain.com:2086/scripts2/doautofixer?autofix=autorepair
Compress Zlib
http://yourdomain.com:2086/scripts2/doautofixer?autofix=Compress-Zlib-1.42.tar.gz
Compresszlibfix
http://yourdomain.com:2086/scripts2/doautofixer?autofix=compresszlibfix
dbdmysql
http://yourdomain.com:2086/scripts2/doautofixer?autofix=dbdmysql
Cooldiagnose_apache_conf
http://yourdomain.com:2086/scripts2/doautofixer?autofix=diagnose_apache_conf
fpindexfile
http://yourdomain.com:2086/scripts2/doautofixer?autofix=fpindexfile
libxml2-2.6.28.tar.gz
http://yourdomain.com:2086/scripts2/doautofixer?autofix=libxml2-2.6.28.tar.gz
libxml64fix
http://yourdomain.com:2086/scripts2/doautofixer?autofix=libxml64fix
pro*
http://yourdomain.com:2086/scripts2/doautofixer?autofix=pro*
spamd_dbm_fix
http://yourdomain.com:2086/scripts2/doautofixer?autofix=spamd_dbm_fix
test
http://yourdomain.com:2086/scripts2/doautofixer?autofix=test
vfilterfix
http://yourdomain.com:2086/scripts2/doautofixer?autofix=vfilterfix
yumduprpmfix
http://yourdomain.com:2086/scripts2/doautofixer?autofix=yumduprpmfix
resellerresourceacctounts
http://yourdomain.com:2086/scripts2/doautofixer?autofix=resellerresourceacctounts
horde_sqmail_current_fix
http://yourdomain.com:2086/scripts2/doautofixer?autofix=horde_sqmail_current_fix

Hướng dẫn tăng tốc website bằng tính năng nén trên cPanel

Đây là bài viết hướng dẫn tăng tốc độ load website, một tính năng có sẵn trên cPanel. Với việc website được nén lại sẽ nhẹ hơn, load nhanh hơn, giúp tối ưu hóa website tốt hơn trên bộ máy tìm kiếm.

Bước 01: Bạn cần đăng nhập vào tài khoản cPanel, tìm đến mục Software and Services, bấm chọn Optimize Website.

optimize_website01.png

Bước 02: Tại đây bạn bấm chọn tiếp Compress All Content hoặc tùy chọn bên dưới, nhưng tốt hơn hết nên chọn tùy chọn này. Sau đó nhấn Update Settings để hoàn tất.

optimize_website02.png

Bước 03: Kết quả sau khi nén website.

optimize_website03.png

Kiểm tra lại quá trình nén website, bạn có thể tìm trên bộ máy tìm kiếm hoặc kiểm tra bằng các website bên dưới.

http://seositecheckup.com (site này khá tốt)
http://checkgzipcompression.com
http://www.gziptest.com
http://www.whatsmyip.org/http-compression-test/
http://www.gidnetwork.com/tools/gzip-test.php

Đối với các bạn nào khi vào cPanel không thấy mục Optimize Website, bạn cần liên hệ hỗ trợ kỹ thuật để họ cập nhật WHM lên phiên bản mới nhất.

theo hoiquantinhoc.vn

August 7, 2015

Hướng dẫn sử dụng easyapache thông qua command line

1. Giới thiệu:
Công cụ easyapache cho phép cài đặt, điều chỉnh, thiết lập các thành phần của PHP và Apache cho WHM và cPanel.Khách hàng có thể sử dụng công cụ này thông qua giao diện hoặc command line. Khi sử dụng phiên bản cPanel trial ta bắt buộc phải thực hiện công cụ này thông qua command line2. Sử dụng easyapache:Khởi động easyapache# /scripts/easyapache
Chọn Customize Profile
Chọn phiên bản apache cần build >> Next StepChọn phiên bản PHP >> Next StepChọn Exhaustive Options List để xem danh sách đẩy đủ các module PHP và Apache
Chọn module PHP hoặc Apache cần build >> Save and Build


Chọn Yes để tiến hành rebuild lại PHP và Apache. Thông thường quá trình này thường mất 15 đến 30 phút để hoàn thành.


Cách build trên WHM

There's a much easier/better way to do this if you are on cPanel 11 Stage 2 and are running PHP 5.

Go to WHM -> Software -> Apache Update. Then proceed through the configuration. When you get to Profile :: Apache :: PHP Main :: PHP Specific :: Basic click on Advanced Configuration. Under PHP 5, select the option for SOAP and proceed with the build process.


You can enable PDO in cPanel if you have cloudlinux installed. In cPanel search for PHP Version and on the resulting screen select and enable PDO and finally select save. *http://docs.cloudlinux.com/index.html?using_php_selector.html
If you do not have CloudLinux and PhpSelector installed you will need an administrator account to install PDO through easyapache. In WHM follow this guide:

Enabling PDO in Easyapache

  1. Log in to WHM ( http://domain.com/whm )
  2. Goto WHM »Software »EasyApache (Apache Update)
  3. Select "Previously Saved Config (** DEFAULT **)" and click "Start customizing based on profile"
  4. On the "Apache Version" page click "Next"
  5. On the "PHP Version" page click "Next"
  6. On the "Short Options List" page click"Exhaustive Options List"
  7. On the "Exhaustive Options List" ensure that PDO, PDO sqlite and PDO MySQL are selected.
  8. Then Click Build on the bottom of the page.
PS. I note that you are on 11.24.5-STABLE. This is a extremely old version of WHM/cPanel. You should update your server as this version of cPAnel is no longer supported by cPanel.

July 25, 2015

Phát hiện tấn công Ddos hoặc botnet vào website bằng cách xem Raw Access Log trên Cpanel và cách phòng chống.

Vào Một Ngày đẹp trời ,bạn phát hiện website đột ngột chậm như rùa, Hoặc website ngốn bandwith 1 cách nhanh chóng mặt.Có thể website của bạn đang bị tấn công.
Một các đơn giản để phát hiện là bạn vào ngay phần Raw access log trên cpanel download log để kiểm tra.
Nếu Bạn thấy 1IP ( Ddos) hoặc nhiều IP (botnet) request liên tục tới 1 Url (đây là điểm yếu của auto)
VD:
183.80.63.252 – – [13/May/2012:18:19:48 -0700] “GET /@4rum/index.php HTTP/1.1″ 403 301 “-”“Mozilla/4.0 (compatible; MSIE 6.0; Windows NT 5.1; .NET CLR 1.0.3705)”
183.80.63.252 – – [13/May/2012:18:19:48 -0700] “GET /@4rum/index.php HTTP/1.1″ 404 297 “-”“Mozilla/4.0 (compatible; MSIE 6.0; Windows NT 5.1; .NET CLR 1.0.3705)”
183.80.63.252 – – [13/May/2012:18:19:48 -0700] “GET /@4rum/index.php HTTP/1.1″ 403 301 “-”“Mozilla/4.0 (compatible; MSIE 6.0; Windows NT 5.1; .NET CLR 1.0.3705)”

Nếu Kẻ tấn công từ 1 IP như trên thì ta thực hiện cấu hình chặn IP bằng file .htaccess như sau:
order allow,deny
deny from 183.80.63.252
allow from all
Nếu bị tấn công liên tiếp vào cùng một vị trí index.php nhưng nhiều IP khác nhau, nếu bạn chỉ sử dụng hàm chặn số lần kết nối trong 1 phút từ 1 IP này, chắc không tính ra được, và nhầm với IP thành viên thực.
– Bạn sẽ chú ý tới các user-agent:
Mozilla/4.0 (compatible; MSIE 6.0; Windows NT 5.1; .NET CLR 1.0.3705)
OK, rất giống nhau, ta block nó đi thôi.
– Nếu bạn block cả cụm đó, bạn sẽ thấy các máy sử dụng windows 5.1 (XP sp2) và sử dụng IE 6 (MSIE 6.0) sẽ cũng không vô được, vậy bạn không nên block tất nó, bạn hãy quan tâm tới phần riêng của nó, ở đây phần riêng là CLR 1.0.3705
OK, block nó thôi, sử dụng code htaccess:
RewriteCond %{HTTP_USER_AGENT} ^1.0.3705
RewriteRule ^.* – [F,L]
Hoặc
SetEnvIfNoCase User-Agent “1.0.3705” bad_bot
Order Allow,Deny
Allow from all
Deny from env=bad_bot
– Nếu một site nào đó lấy thông tin get nhiều file của bạn từ một trang web, hãy block kết nối trang web đó tới website của bạn:
RewriteEngine On
RewriteCond %{HTTP_REFERER} ^http://.*1-vài-ký-tự-trong-domain.com [NC]
RewriteRule .* – [F]
Các bước ở trên là các bước cơ bản để hạn chế các cuộc tấn công vào website của bạn.Ngoài các cách trên,bạn có thể sử dụng các mod,plusin,script,để hạn  chế như blockscript (có tính phí).Mong rằng bài viết này sẽ hữu dụng cho các bạn.

Hướng dẫn fix lỗi Data Error khi truy cập File Manager trong cpanel

Đã bao giờ bạn truy cập File Manager trong cpanel để quản lý file,nhưng bạn không thấy bất kỳ 1 file nào ngoài thông báo  “Data Error” ?
Lỗi không hiển thị file trong  File Manager như trên vì lý do nào đó,bạn đã chmod cho file .htaccess trong thư mục public_html là 000 ( không gán quyền nào cả).
Bạn có thể fix như sau :
Truy cập cpanel ,tại phần quản lý file trong cpanel bạn click vào   Legacy File manager (nhớ tick vào Show Hidden Files)

Click chọn file .htaccess sau đó phía bên phải trên trình duyệt sẽ hiện thị các thao tác có thể thực hiện cho file này.Bạn chọn Change Permissions sau đó CHMOD cho file này là 644.
Sau khi thực hiện các bước trên bạn có thể vào  File Manager trong cpanel  và refesh (F5) lại,các bạn sẽ thấy file hiển thị bình  thường.

July 22, 2015

Các lệnh autofix dành cho cPanel/WHM

Một số lệnh autofix giúp bạn có thể thực hiện các tác vụ trên hệ thống trong nhiều trường hợp, chẳng hạn như đổi SSH port và quên mất, hay bạn block nhầm chính IP mình đang truy cập trên cổng FTP chẳng hạn.
Flushing iptables rules
http://yourdomain.com:2086/scripts2/doautofixer?autofix=iptablesflush
Restart SSH in safe mode
http://yourdomain.com:2086/scripts2/doautofixer?autofix=safesshrestart
Reset the Firewall Settings
https://yourdomain.com:2087/scripts2/doautofixer?autofix=iptablesflush
Reset the SSH Settings
http://yourdomain.com:2086/scripts2/doautofixer?autofix=safesshrestart
bsdbindfix
http://yourdomain.com:2086/scripts2/doautofixer?autofix=bsdbindfix
Autorepair
http://yourdomain.com:2086/scripts2/doautofixer?autofix=autorepair
Compress Zlib
http://yourdomain.com:2086/scripts2/doautofixer?autofix=Compress-Zlib-1.42.tar.gz
Compresszlibfix
http://yourdomain.com:2086/scripts2/doautofixer?autofix=compresszlibfix
dbdmysql
http://yourdomain.com:2086/scripts2/doautofixer?autofix=dbdmysql
Cooldiagnose_apache_conf
http://yourdomain.com:2086/scripts2/doautofixer?autofix=diagnose_apache_conf
fpindexfile
http://yourdomain.com:2086/scripts2/doautofixer?autofix=fpindexfile
libxml2-2.6.28.tar.gz
http://yourdomain.com:2086/scripts2/doautofixer?autofix=libxml2-2.6.28.tar.gz
libxml64fix
http://yourdomain.com:2086/scripts2/doautofixer?autofix=libxml64fix
pro*
http://yourdomain.com:2086/scripts2/doautofixer?autofix=pro*
spamd_dbm_fix
http://yourdomain.com:2086/scripts2/doautofixer?autofix=spamd_dbm_fix
test
http://yourdomain.com:2086/scripts2/doautofixer?autofix=test
vfilterfix
http://yourdomain.com:2086/scripts2/doautofixer?autofix=vfilterfix
yumduprpmfix
http://yourdomain.com:2086/scripts2/doautofixer?autofix=yumduprpmfix
resellerresourceacctounts
http://yourdomain.com:2086/scripts2/doautofixer?autofix=resellerresourceacctounts
horde_sqmail_current_fix
http://yourdomain.com:2086/scripts2/doautofixer?autofix=horde_sqmail_current_fix

July 14, 2015

Disk Space for MySQL Databases in cPanel Show as 0MB

When you upgrade from cPanel 11.24 to 11.25, your users may notice that in cPanel, their MySQL databases show 0MB of disk space used, when they know their databases are much larger. This is due to an option in cPanel that you specifically have to enable. To enable MySQL disk usage tracking:
1) Edit /var/cpanel/cpanel.config
Change:
disk_usage_include_sqldbs=0
to
disk_usage_include_sqldbs=1
Then run the following:
/scripts/update_db_cache
This may take a few minutes if you have a ton of users with databases, but after this, you should see the database disk usage show up accurately in cPanel.

5 Ways to Get a User’s Disk Usage

This may seem pretty simple, but I see a lot of questions about how to get a user’s disk space usage on a cPanel user. I put together a quick list of 5 simple ways for the average admin:
 1) Good ole’ cPanel/WHM. You can see the usage on the left-hand side of cPanel, or in the ‘List Accounts’ view of WHM
 2) Quota cache:
egrep “^${user} ” /var/cpanel/repquota.cache
3) Actual quota:
quota -v | egrep “^${user} “
4) Manual du:
du -h /home/$user
5) cPanel datastore:
cat /home/$user/.cpanel/datastore/_usr_bin_quota_-v

How to Delete all logs in a cpanel server - SSH

The command below will delete/empty all files in '/path/to/the/logdirectory' directory.

for i in $(find /path/to/the/logdirectory -type f); do echo > $i; done

You can empty the logs files via SSH as user root using the 'echo' command

echo > /path/to/the/logfile

You should be aware of the list of different log files on a cPanel server.

BTW, why are you looking to delete the log files from your server? If the problem is with the limited disk space, you can always use Log Rotation to rotate the log files in timely manner and delete old logs.


The  path to various logs files on a cPanel server for different services is listed below:
Apache Web Server Logs:
/usr/local/apache/logs/access_log
/usr/local/apache/logs/error_log
Exim (Email) Logs:
/var/log/exim_mainlog
/var/log/exim_paniclog
/var/log/exim_rejectlog
Ftp Logs:
/var/log/messages
Mysql Logs:
/var/lib/mysql/server.hostname.err
Cronjob Logs:
/var/log/cron
Server Logs:
/var/log/messages
SSH Logs:
/var/log/secure
cPanel Installation Logs:
/var/log/cpanel-install-thread0.log
ChkServd (cPanel Monitoring Daemon) Logs:
/var/log/chkservd.log
Named (Bind) Logs:
/var/log/messages
Last successful login attempts to the server:
/var/log/wtmp (but to view the details, execute the command “last”)
Last unsuccessful login attempts to the server:
/var/log/utmp (To view the logs, execute “lastb” command)
Domlogs of an Account:
/usr/local/apache/domlogs/domainname.tld
Mod Security Logs:
/usr/local/apache/logs/modsec_audit.log
/usr/local/apache/logs/modsec_debug_log
Apache SUEXEC Logs:
/usr/local/apache/logs/suexec_log
cPanel Access and Error Logs:
/usr/local/cpanel/logs/access_log
/usr/local/cpanel/logs/error_log
Stats Execution Logs:
/usr/local/cpanel/logs/stats_log
cPanel License Logs:
/usr/local/cpanel/logs/license_log
cPanel Backup Logs:
/usr/local/cpanel/logs/cpbackup/*.log
Tomcat Logs:
/usr/local/jakarta/tomcat/logs/catalina.err
/usr/local/jakarta/tomcat/logs/catalina.out

How to Clean Log Files Before You Enable Log Rotation

Checking disk space usage and removing old log files

cPanel & WHM create and maintain log files. These log files allow you to examine errors and other occurrences on the system.
After an extended period of time, the system's storage devices will begin to fill, as the log files contain more information. You need to delete some old log files or remove some data from the log files to reduce the amount of disk space the log file is using.
You can find the locations of log files using the log file reference graphic or order a free log reference poster from our site!

Checking disk space using the du command

To find out which files and directories consume the most space inside of the /var/log directory, we can use the  du  command. This command will print the estimated disk space usage of each file and directory specified.
1
du -h /var/log/ 

In the example above, the -h argument causes the command to print the information in a human-readable format. When you issue the command in this way, the du utility will print the estimated disk space of each file and directory contained within /var/log.
The output of this command should resemble the following example:
1
2
3
4
5
6
7
8
9
10
11
12
13
14
15
16
17
18
root@host [~]# du -h /var/log/
24K   /var/log/cups
16K   /var/log/mail
36K   /var/log/prelink
19M   /var/log/audit
84K   /var/log/bandwidth/2011/Jun
128K   /var/log/bandwidth/2011/Jan
116K   /var/log/bandwidth/2011/Feb
712K   /var/log/bandwidth/2011
4.5M   /var/log/bandwidth
2.6G   /var/log/munin
8.0K   /var/log/conman.old
8.0K   /var/log/pm
8.0K   /var/log/conman
12K   /var/log/dcpumon/boot.1308161402
5.3M   /var/log/dcpumon
8.0K   /var/log/vbox
3.7G   /var/log/
You should expect more output from the utility than is listed in the example above. Due to the size of the files and directories in /var/log, the du utility can take a long time to finish.
Once we have this information, we can examine the numbers in the far left column. These numbers represent the file size of each file and directory contained within the working directory, in human-readable format.

Removing files using the rm command

To clear some disk space, we will need to remove the offending files. We can use the rm command to do so. This utility removes files from the file system.
1
rm -f $file 

In the example above, the -f argument forces the removal of the file. This means that you will not be prompted to confirm that you wish to remove the file. Use the -f argument to save time. However, you will need to be absolutely certain that you are ready to delete the file.
The $file parameter is the path to the file (or directory) you wish to remove. For our purposes, we will only remove single files, rather than entire directories.
If we examine the output of the du -h /var/log command, we will notice that the largest directory is /var/log/munin. Let's remove one of the munin logs.
1
2
3
4
5
6
7
8
9
10
11
12
13
root@host [~]# cd /var/log/munin/
root@host [/var/log/munin]# du -h
2.7 G.
root@host [/var/log/munin]# du -h *
603M   munin-graph.log
385M   munin-html.log
67M   munin-limits.log
99M   munin-node.log
1.5G   munin-update.log
root@host [/var/log/munin]# rm -f munin-update.log
root@host [/var/log/munin]# du -h
1.2G   .
root@host [/var/log/munin]#  

Let's review what we have done in the example above:
  1. We used the cd command to change directories to /var/log/munin/.
  2. We issued the du command to find out how much disk space /var/log/munin was using. In this case, it was 2.7 gigabytes.
  3. We issued another du command with an asterisk (*). This allowed us to view the disk space usage for each individual file in /var/log/munin. In this case, the largest file was munin-update.log at 1.5 gigabytes.
  4. We then used the rm -f command to remove /var/log/munin/munin-update.log.
  5. Finally, we confirmed that we successfully removed the 1.5-gigabyte log file. To do this, we issued another du command, which confirmed that the directory now uses 1.2 gigabytes of hard disk space.

Freeing up disk space without deleting the log file

If you wish to keep some information from a log file, use the tail command. This command reads and outputs the contents of a file, from the bottom up. This allows you to preserve the most recent information in the log file. You can even specify the number of lines from the file that you wish to keep, and store these lines of data in another file.
1
tail -5000 $file-1 > $file-2 

In the example above, the tail utility takes the last 5000 lines from $file-1 and storesthat information in $file-2.
Once we have created this new file, we can remove the old file ($file-1) from the file system with the rm utility. Then, we can rename the new file.
To rename a file, we can use mv command.
1
mv $old-file $new-file 

Example

In the following example, we will:
  1. Check the disk usage of everything contained within the working directory.
  2. Copy the last 5000 lines from audit.log.2 to audit.log.2.temp
  3. Remove the old audit.log.2 file from the file system.
  4. Rename the newly created audit.log.2.temp to its old file name, audit.log.2
1
2
3
4
5
6
7
8
9
10
11
root@host [/var/log/audit]# du -sh *
1.8M   audit.log
5.1M   audit.log.1
5.1M   audit.log.2
root@host [/var/log/audit]# tail -5000 audit.log.2 > audit.log.2.temp
root@host [/var/log/audit]# rm -f audit.log.2
root@host [/var/log/audit]# mv audit.log.2.temp audit.log.2
root@host [/var/log/audit]# du -h *
1.8M   audit.log
5.1M   audit.log.1
864K   audit.log.2 

We can see from the du utility's output that audit.log.2 has reduced considerably in size, from 5.1 megabytes to 864 kilobytes.

Configuring log rotation

cPanel & WHM's log rotation system compresses and stores old log files in /usr/local/cpanel/logs/archive/. You can enable and configure log rotation in WHM at Home >> Service Configuration >> cPanel Log Rotation Configuration.
The archived log files are stored indefinitely, so you will need to manually remove them. You can use the rm command to remove old log files.

Additional Resources