Showing posts with label outlook. Show all posts

April 11, 2020

How To Create A Contact Group Outlook From Excel/Notepad Data?

This method will guide you quickly create a contact group from Excel data or Notepad, without applying the Import and Export Wizard in Outlook. Please do as follows:

1. Open the Excel workbook that you will create a contact group from, select the data, and press Ctrl + C keys together to copy it.
2.in Outlook, and click Home > New Items > More Items > Contact Group.


3. Now a Contact Group window is opening. Please click Add Members > From Outlook Contacts.

4. In the popping out Select Members dialog box, put the cursor in the Members box, press Ctrl + V keys simultaneously to paste the Excel data, and then click the OK button.

5. Now you return to the Contact Group window. Please type a name for the new contact group in the Name box, and then click Contact Group > Save & Close button.
So far, you have created a contact group from an Excel workbook already

Thank you


May 25, 2018

November 24, 2016

How to copy folder structure to new pst data file in Outlook?

arrow blue right bubbleCopy folder structure to new pst data file in OutlookM

In Outlook, you can use the archive feature to create a new pst date file with the same folder structure of the old one. Please do as follows.
1. Open the Archive dialog box.
1). In Outlook 2010 and 2013, please click File > Info > Cleanup Tools > Archive. See screenshot:
2). In Outlook 2007, click File > Archive.
2. In the Archive dialog box, please do as follows.
1). Select Archive this folder and all subfolders option;
2). Select the root of the folders which you would like to copy the folder structure based on it;
3). In the Archive items older than box, specify a past date that no emails will get moved. For example, if the oldest email in your mail folder was stored in 02/01/2013, you can set the archive items older than box as 01/01/2013;
4). Click the Browse button. See screenshot:
3. Then the Open Outlook Data Files dialog box pops up. Click the OK button.
4. Click the OK button when it returns to the Archive dialog box.
5. Then Outlook starts archiving.
6. After archiving, a new Archive pst data file is displaying in the Navigation Pane with the same folder structure of the one you specified above.
7. Now you need to get into the Account Settings dialog box to rename this data file.
1). In Outlook 2010 and 2013, click File > Info > Account Settings > Account Settings.
2). In Outlook 2007, click Tools > Account Settings.
8. In the Account Settings dialog box, click the Data Files tab, select the Archives data file which you are created just now in the box, and click the Settings button. See screenshot:
9. In the Outlook Data File dialog box, rename the data file in the Name box, then click the OK button.
10. Close the Account Settings dialog box.
Now you can see the new pst data file is renamed successfully.

Reference : https://www.extendoffice.com/documents/outlook/2385-outlook-copy-folder-structure-new-pst.html

December 29, 2015

Tự động hoá cho Mail Outlook

Ở công sở, Mail Outlook gần như trở thành một thành phần không thể thiếu của người dùng hệ điều hành windows. Hơn ai hết, đối với những người làm việc văn phòng, công việc đầu tiên khi sử dụng máy tính hầu như là "check mail" (kiểm tra thư mới). Nếu bạn là người thường xuyên sử dụng Mail Outlook, thì việc làm cho hệ thống mail hoàn toàn tự động ít nhiều sẽ giúp công việc của bạn thêm trôi chảy và nhanh chóng.

Khởi động Outlook cùng Windows
Không ít người khi mở máy tính là lao ngay vào công việc mà quên mất việc check mail cũng quan trọng không kém. Để không phải quên check mail mỗi ngày bạn hãy thiết lập cho mail tự khởi động cùng windows bằng cách kéo thả biểu tượng mail Outlook vào Start > Programs > Startup. Có như vậy, mỗi khi khởi động máy tính, chương trình Mail Outlook cũng được tự động khởi động cùng windows.


Thiết lập tính năng tự động check mail
Thông thường, khi mới mở Outlook, chương trình sẽ tự động kiểm tra mail mới cho bạn. Tuy nhiên, trong quá trình sử dụng không phải lúc nào Outlook cũng tự động kiểm tra email dù đã có mail mới, mà đòi hỏi bạn phải tự kiểm tra bằng cách click nút Send/Receive trên thanh công cụ. Trong Outlook có một tính năng giúp bạn có thể thiết lập cho Mail Outlook tự động check mail mới theo thời gian định trước. Không những vậy bạn còn có thể thiết lập cho Outlook tự động check mail khi đang ở trạng thái offline (khi chương trình mail chưa được khởi động).
Để làm được điều này outlook 2003 bạn vào Tools > Options...
Cửa sổ Options hiện ra bạn chọn thẻ Mail Setup > click nút Send/Receive... trong phần Send/Receive. (Hình 1)


Cửa sổ Send/Receive Groups hiện ra để bạn thiết lập tính năng tự động gởi và nhận mail. 
Để chọn tính năng tự động gởi và nhận mail cho tất cả các tài khoản bạn chọn All Accounts.
Trong phần Setting for group "All Accounts", bạn đánh dấu chọn dòng:
+ Include this group in send/receive (F9)
+ Schedule an automatic send/receive every và chọn khoảng thời gian bạn muốn Outlook sẽ tự check mail một lần. Tốt nhất bạn nên chọn khoảng thời gian này là 5 phút một lần.
+ Perform an automatic send/receive when exiting, chọn khi bạn muốn chương trình hiển thị quá trình check mail tự động.


Tiếp đến, để thiết lập cho Outlook tự check mail khi chương trình chưa được khởi động bạn nhấp chọn vào hai dòng còn lại trong phần When Putlook is Offline, và thiết lập khoảng thời gian để Outlook check mail một lần. Ở đây bạn có thể chọn mỗi 15 phút.
Sau khi hoàn tất bạn nhấp Close để đóng cửa sổ lại rồi nhấp OK.
Như vậy, cứ mỗi 5/15 phút là chương trình Outlook sẽ tự động kiểm tra mail một lần. Khi có mail mới đến chương trình sẽ thông báo cho bạn biết bằng một cửa sổ nhỏ xuất hiện bên góc phải màn hình.


link hướng dẫn cho outlook 2010,2007..
http://www.howtogeek.com/howto/17890/schedule-auto-send-receive-in-microsoft-outlook/

Tự động lọc mail đến thư mục định trước


Như vậy, bạn đã thiết lập xong tính năng tự động check mail cho Mail Outlook. Bên cạnh đó, để hệ thống mail của bạn có trật tự và dễ tìm, bạn nên sắp xếp cho mail đến được phân loại một cách rõ ràng. Ví dụ bạn sẽ làm cho email khách hàng khi gởi đến sẽ tự động được đưa vào thư mục Khách hàng, mail gởi đến từ những người trong phòng hành chánh sẽ vào thư mục Hành Chánh. Như vậy bạn sẽ dễ dàng tìm kiếm email vì email đã được phân loại theo địa chỉ người gởi một cách rõ ràng.
Bước 1: Khởi động chương trình mail Outlook tạo một thư mục mới trong Inbox (hoặc bạn có thể tạo trong 1 thư mục bất kỳ) bằng cách click phải vào thư mục Inbox chọn New Folder... (Hình 3). Đặt tên cho thư mục mới tạo, ví dụ: Khách Hàng.


Bước 2: Vào Tool > Rules and Alerts... Cửa sổ mới hiện ra, trong thẻ E-mail Rules nhấp chọn New Rules, chọn Move messages from someone to a folder rồi nhấp Next. (Hình 4)
Đánh dấu chọn dòng from people or distribution list trong khung Step 1: Select condition(s).
Tiếp đến click vào dòng chữ people or distribution list trong khung Step 2: Edit the rule description bên dưới để mở cửa sổ Rule Address.
Trong cửa sổ Rule Address vừa mở ra, bạn chọn địa chỉ mail người gởi (bạn có thể chọn nhiều địa chỉ mail của nhiều người khác nhau. Ở ví dụ này sẽ chọn địa chỉ mail của khách hàng có tên Bích Hiền) rồi click nút From để chọn tiếp đó nhấn Ok > Next.
Để có danh sách địa chỉ mail trong cửa sổ Rule Address bạn phải tạo trước danh sách mail liên hệ trong mục Contacts của Outlook...


Bước 3: Trong cửa sổ tiếp theo bạn sẽ chọn thư mục để mail đến bằng cách click chọn dòng move it to the specified folder trong khung Step 1: Select action(s), rồi click vào dòng Specified trong khung Step 2: Edit the rule description và chọn thư mục để chứa email (ví dụ thư mục ở đây là thư mục Khách Hàng) rồi click OK > nhấn Next 2 lần. (Hình 5)


Bước 4: Trong cửa sổ cuối cùng bạn nhập tên cho rule trong Step 1:... rồi click chọn hai dòng trong phần Step2:... rồi nhấn Finish để hoàn tất. (Hình 6)


Sau khi nhấn nút Finish chương trình sẽ bắt đầu lọc tất cả email của khách hàng có tên Bích Hiền vào thư mục Khách Hàng vừa tạo ngay cả khi có mail mới đến.
Lập lịch báo tự động
Không chỉ đơn thuần là phần mềm dùng để gởi nhận email. Outlook còn là một công cụ đắc lực giúp bạn quản lý thời gian làm việc của mình. Bạn có thể thiết lập cho Outlook tự động thông báo lịch làm việc cho bạn theo ngày, tuần hoặc tháng trong phần Calendar (lịch).

Đầu tiên bạn vào mục Calendar trong Outlook bằng cách nhấp vào thanh Calendar bên trái cửa sổ mail.
Lúc này bạn sẽ thấy cửa sổ Calendar hiện ra, click chọn nút Day, Work Week, Week, Month trên thanh công cụ để xem lịch ngày, tuần hoặc tháng.


Click đôi chọn một thời điểm trong khung Calendar để tạo một lịch hẹn. Cửa sổ Untitled - Appointment xuất hiện để bạn điền thông tin việc cần làm.
Điền tên công việc và nơi thực hiện công việc trong khung Subject và Location.
Chọn mức độ quan trọng của công việc trong khung Label.

Chọn thời gian bắt đầu và thời gian kết thúc công việc trong khung Start Time và End Time. Nếu là sự kiện cả ngày bạn có thể click chọn dòng All day event.
Để Outlook tự động thông báo khi lịch đến, bạn phải click chọn dòng Reminder. Tốt nhất bạn nên chọn khoảng thời gian thông báo trước 10, 15 hoặc 30 phút... trong khung kế bên.
Nếu bạn muốn Outlook thông báo lịch hẹn bằng âm nhạc bạn có thể click nút biểu tượng hình cái loa để chọn bài nhạc ưa thích. (Chương trình chỉ hỗ trợ nhạc có định dạng đuôi chấm wav.).
Cuối cùng nhấp Save and Close để lưu và đóng lại những thiết lập vừa thực hiện. Như vậy, khi có lịch đến Outlook sẽ tự động bật bảng thông báo công việc kèm theo bài nhạc bạn đã chọn. 

theo zensoft

December 17, 2015

How to fix “Outlook data file cannot be accessed” error (Solved)

In a customer’s computer, the following error appeared during “Send/Receive Progress” in Outlook 2013 “Sending reported error (0x8004010F) : ‘Outlook data file cannot be accessed.’” The above error may occur if the Outlook profile is corrupted or after transferring the Outlook .PST file to another location on your disk or to another computer. 

After doing some research, I finally found a simple solution to resolve “Outlook data file cannot be accessed” error:
image
 

How to fix “Reported error (0x8004010F) – ‘Outlook data file cannot be accessed” – Outlook 2010 or 2013

1. Open Outlook “Account Settings”.

image
2. At “E-mail” tab, highlight the account with the problem and click “Change Folder”.
image
3. Click “New Outlook Data File”.

image
4. Give a name for the new data file (e.g. “TEST”) and press “OK”.
5. Expand the new data file (e.g. “TEST”) and select the “Inbox” subfolder. Choose “OK”.

image
6. While at Account Settings screen, click “Change Folder” again.
image
7. This time select the correct data file and folder that you want to store e-mail messages and choose “OK”.
image

8. Close “Account Settings” and click “Send/Receive”.

You ‘re done!

October 19, 2015

Recalling Email Messages in Outlook 2007 /2010

HƯỚNG DẪN LẤY LẠI EMAIL ĐÃ GỬI TRONG MS OUTLOOK 2007
Bước 1: Từ giao diện gửi thư trên Outlock bạn vào thư mục Sent Items trong khung mail của bạn và sau đó mở tin nhắn bạn không nên đã gửi trong mục này:
Bước 2: Nhắp đúp để hiển thị mail ra cửa sổ mới. Trong cửa sổ của Mail đó bạn vào Action trên thanh Menu và chọn tiếp Recall This Message để chọn chức năng lấy lại thư.
Outlook 2007
Outlook 2010:

Bước 3: Sau khi bạn chọn chức năng này thì Outlock sẽ chọn bạn hai lựa và bạn hãy chọn Delete unread copies of this message để xóa đi mail đã gửi mà chưa đọc ở người nhận.
Vậy là xong quá trình lấy lại mail đã gửi .
Trên đây là một cách rất hiệu quả để lấy lại mail đã gửi mà cho người thân gặp sai sót và thiếu nôi dung. Bằng cách này bạn có thể lấy lại mail đã gửi để giảm thiểu thiệt hại

August 18, 2015

Fix your Outlook email connection by repairing your profile

Do you have an Office 365 account?

The Office 365 Support and Recovery Assistant can diagnose and fix several Outlook issues for you, including fixing your Outlook profile. You can download the tool here (English only).

Repair a profile in Outlook 2007

  1. In Outlook 2007, click Tools > Account Settings.
  2. On the Email tab, select your account (profile), and then click Repair.
  3. Follow the prompts in the wizard, and when you’re done, restart Outlook.

Repair a profile in Outlook 2010 or 2013

  1. In Outlook 2010 or 2013, click File.
  2. Click the down-arrow next to Account Settings, and then Account Settings.
  3. On the Email tab, select your account (profile), and then click Repair.
  4. Follow the prompts in the wizard, and when you’re done, restart Outlook.

Outlook connection still not working?

  • Run Windows Update to make sure you have the latest updates for Outlook and other desktop apps for Office 365.
  • Download and run the Office 365 Support and Recovery Assistant here (English only).

August 14, 2015

How to Remove Password from Outlook PST File?

How to Apply Password on Outlook PST Files?

Please follow the Steps to Apply a Password to your Outlook PST file.
Step 1: Do according to your Outlook version:
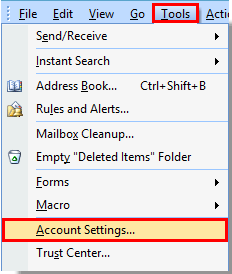
  • In Outlook 2007, Click on Tools ⇒ Account Settings
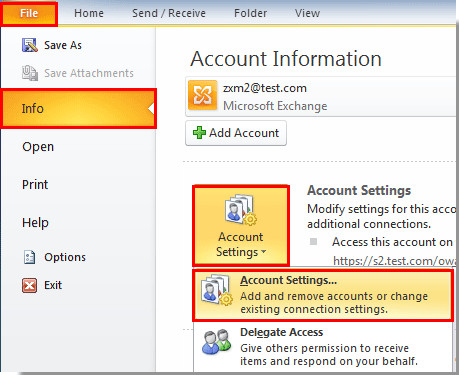
  • In Outlook 2010, Click on File tab ⇒ Move your Cursor on Info ⇒ Go to Account Settings
Apply Password on Out PST 2007 and 2010
In Both Outlook 2007 and 2010, Account Settings Tab pops up like the image below
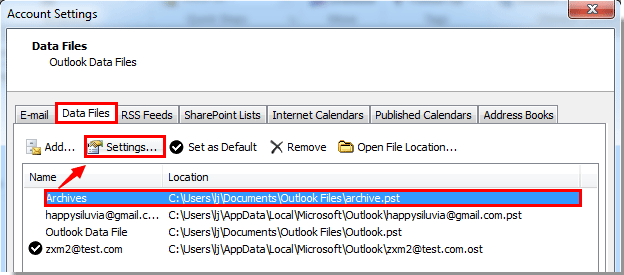
Account Settings Outlook 2007 and 2010
Step 2: Click on Data Files tab  Select the PST folder ⇒click on Settings
Data files Outlook 2007 and 2010
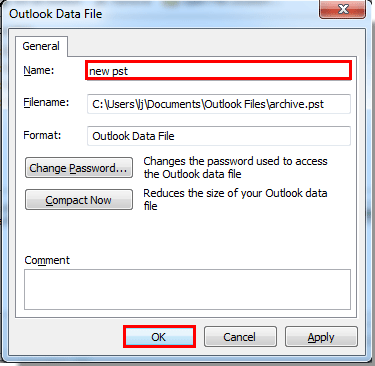
Step 3: Once you click on Settings, a popup will appear to change password as shown in the image below:
Set Password in Outlook 2007 and 2010
Step 4: Enter your desired password and click OK
set outlook PasswordThe above 4 steps are really easy to follow and you can protect your Outlook PST using this inbuilt method.

Outlook PST Password is Incorrect

The issue is quite frustrating when you find that your PST file is password protected and you’ve forgotten the password you applied. You would have already tried multiple password combinations with CAPS Lock on and off, but failed to unlock your PST file.
PST Password Incorrect

How to Unlock Password Protected PST file – Unlock PST ?

Well you can easily recover password of your protected Outlook PST file. There are a couple of options available to unlock PST file.
  1. Third party Password Recovery Tool (Commercialware)
  2. pst19upg.exe” utility by Microsoft
I always consider every PST file crucial, but you have to decide the option, whether you give more value to time or money. If you consider using a paid tool to remove your PST password, you can go with an extensive search on Google or any other search engine. Besides that, I would personally recommend you to use PST Password Recovery Tool by SysInfoTools.
Remove PST Password for Free
If you do not want to use any third party tool, you can still remove your password by using “pst19upg.exe”.
The “pst19upg.exe” utility was designed by Microsoft to upgrade the PST file format to version 19. Its a nice and free to download utility which upgrades your PST file and also removes the password applied on it. You can easily download pst19upg.exe utility from here.
This process is a bit lengthy, please follow the steps to remove your PST file password using “pst19upg.exe” and “Scanpst.exe”.
If the protected PST file you have, is created in an older version of Microsoft Outlook, there is an ANSI PST file which is used by MS Outlook.
Follow the steps to remove the password from Older MS Outlook Versions (ANSI PST file):
  • Close MS Outlook program running in your computer
  • Locate Scanpst.exe in your computer
  • In Microsoft Outlook 2002 and XP – Locate Scanpst.exe here
C:Program FilesCommon FilesSystemMAPI<locale ID>scanpst.exe
  • In Outlook 2000, locate here:
C:Program FilesCommon FilesSystemMAPI<locale ID>NTscanpst.exe
  • In Outlook 97 or 98, locate Scanpst file here:
C:Program FilesCommon FilesWindows Messagingscanpst.exe
Though, you’ll be able to find scanpst.exe in the above mentioned locations, but if it is not located there, you may download scanpst.exe by visiting the link provided above.
Run Scanpst.exe and click on Repair. Please keep a backup of your PST file before you run this utility.
  • Click on Start ⇒ Run (or Press Win+R key on keyboard).
  • Type CMD and hit enter (to open command prompt).
  • Copy the path of your PST file into command prompt followed by pst19upg.exe-outlook.com.
  • Example: C:Program FilesMicrosoft Officepst19upg.exe-outlook.com.
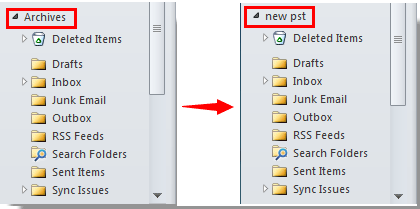
  • A fresh copy of PST file will be created with .psx extension.
  • Now rename your original PST file to avoid clash.
  • In command prompt, type “pst19upg.exe- newpsxfile.psx” (hit enter).
  • You’ll get a new Outlook PST file without any password.
  • Run Scanpst.exe and repair the new file created.
  • Open MS Outlook again and check your PST file.
These are the two solutions that could be implemented to unlock password protected PST files. You can go with the paid solution and let the software take pain for you, or you may go for the other solution, which is a bit tricky but successful if done properly.
Note : Password recovery by third party tool gives 100% success rate, but the other option might fail in few scenarios.